Now design your own changho — and see it placed in a real space with AI.
Se-sal
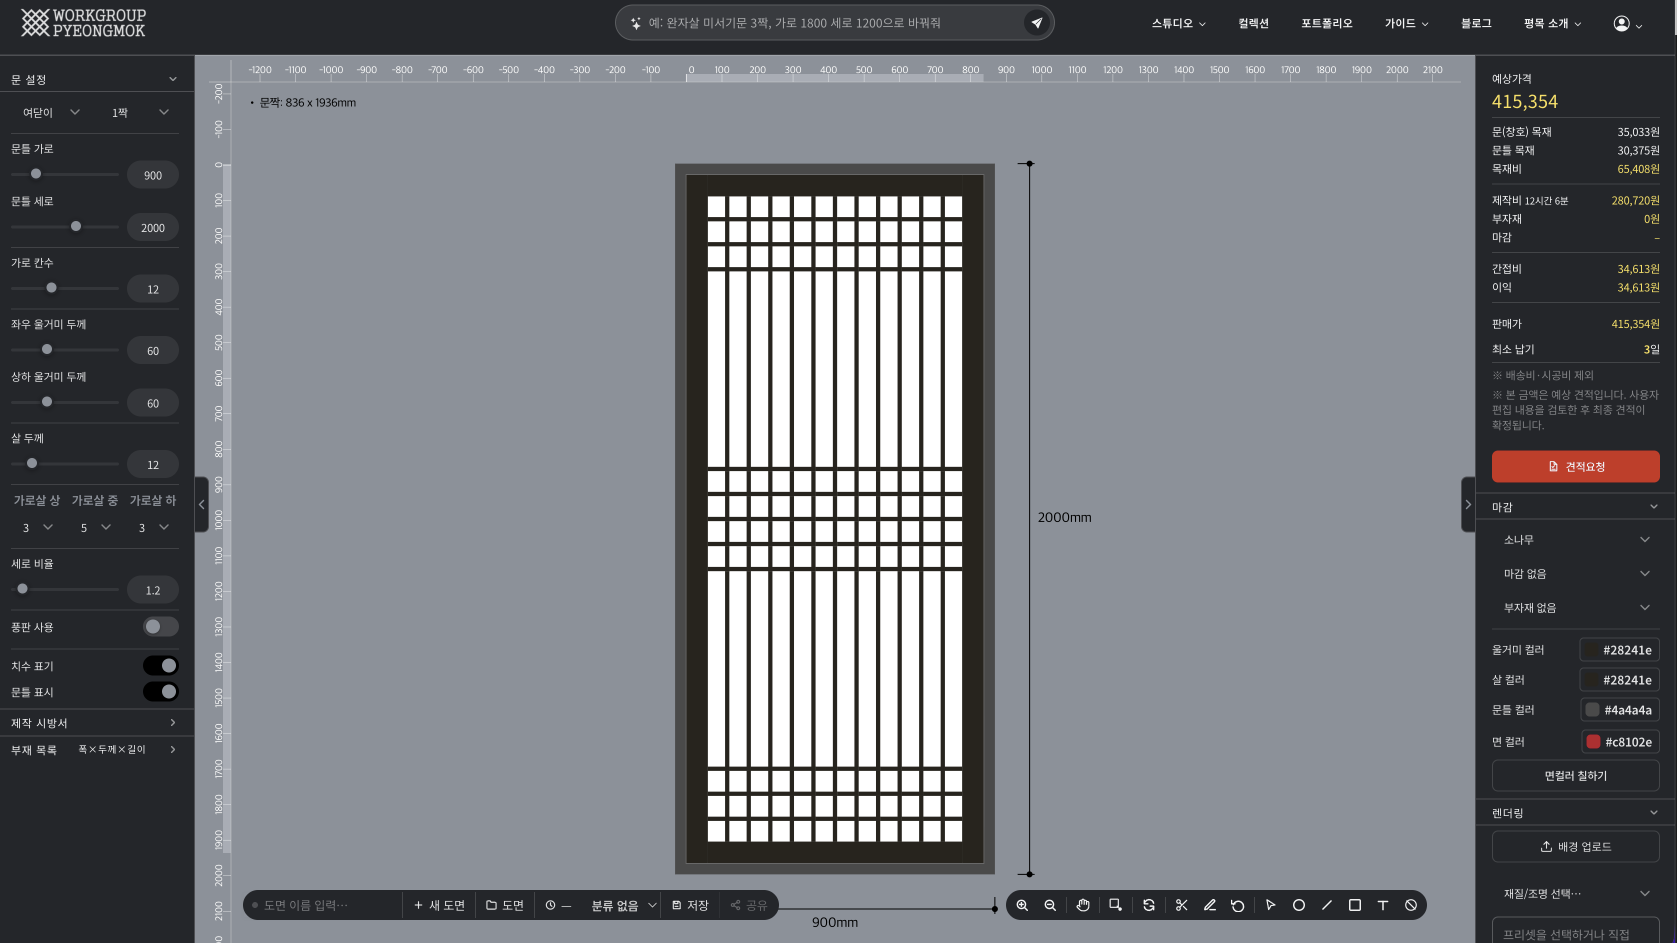
This engine recreates Se-sal (細箭), a changho whose frame is filled with closely spaced
vertical slats, crossed by only three or four horizontal slats at the top, middle and bottom.
The name comes from 細 ("fine"), pointing to the slats' slenderness — the fine, straight grain
created by those dense vertical slats is the face of this changho. Also called ttisal-chang,
it was the most widely used lattice changho form of the Joseon period.
The studio is laid out in three panels — the design sidebar on the left, the canvas,
and the background and export sidebar on the right — and every parameter change appears
on the canvas immediately.
Screen Layout
① Left Sidebar — Design Parameters
Door settings
Item
Options
Description
Door type
Hinged / Sliding
Hinged: hinge construction. Sliding: sliding rail construction
Number of panels
1 – 4
The total width is divided evenly as you add panels
Door dimensions
Item
Range
Unit
Frame width
400 – 3,000
mm
Frame height
400 – 3,000
mm
The values you enter here are the wall opening (outer frame) dimensions. The actual door panel size is calculated by automatically subtracting the frame thickness and clearance (set by the administrator), and sliding doors are further adjusted for the width where panels overlap. You can check the resulting measured dimensions under Production Specification below.
Lattice settings
Item
Description
Horizontal cells
Number of horizontal divisions (slat count = cells − 1)
Left/right stile thickness
Thickness of the left and right outer frame members (mm)
Top/bottom rail thickness
Thickness of the top and bottom outer frame members (mm)
Slat thickness
Cross-section thickness of the lattice slats (mm)
Horizontal slat layout (top/middle/bottom)
Set the horizontal cell count of each of the three zones independently, e.g. 3/5/3
Vertical ratio
Height ratio between the top, middle and bottom zones
Use transom panel
Adds a transom panel zone at the top when checked. Its height is set separately
Show dimensions
Displays each member's measured dimensions on the canvas when checked
Show door frame
Displays the door frame (wall opening) outline on the canvas when checked
Production specification
Measured dimensions calculated automatically from the parameters you enter.
Item
Description
Frame width / height
Wall opening dimensions (exactly as entered)
Outer width / height
Full door panel size (including stiles and rails), calculated with frame thickness and clearance removed
Inner width / height
Effective inner dimensions, excluding stiles and rails
Horizontal / vertical cells
Lattice division counts
Eye size
Inner size of a single lattice cell
Slat list
Lengths × quantities for vertical slats, horizontal slats and frame members
② Canvas — Preview & Controls
Drawing management bar (top)
Button
Function
Enter drawing name…
Type a name for the drawing. It is stored in the cloud under this name when saved.
New drawing
Resets the current drawing and starts a new one
Drawings
Opens the list of saved drawings so you can switch to another one
Version ▾
Save history for the current drawing. Click to restore an earlier version from the dropdown
Canvas toolbar (bottom)
The bottom of the canvas gathers the view controls — zoom and pan — along with the slat
delete/add editing modes, motif placement and shape drawing buttons.
These are shared across all six engines; see the
Canvas Toolbar page for the full list and how to use them.
③ Right Sidebar — Finish · Background · Saving
Save / order
Button
Function
💾 Save
Saves the current drawing to the cloud. Saving under the same name adds a version.
Order
Goes to the production inquiry page based on the drawing you designed
Finish settings
Item
Options
Wood
Red pine / Pine / Oak
Inner surface
Hanji paper / Glass / Acrylic
Frame color
Choose from the color palette
Slat color
Choose from the color palette
Panel color
Set directly with the HEX color picker. Use Fill to color specific cells
Background photo & AI rendering
Upload a photo of the site, composite it with your drawing, and render it with AI.
See the Using AI Rendering page for details.
Export
Button
Output
PNG
Downloads the current canvas view as a transparent-background PNG
PDF
Print-optimized PDF, including dimension annotations
PNG export does not include the background photo — only the drawing (the lattice layer) is output, on a transparent background. AI rendering results are downloaded separately from the rendering popup.